I will explain two different approaches, the classical one when we have root privileges, and a very particular one by downloading the sources and installing it without root permissions.
A. Install Trac in the classical way.
1. Install easy_install tool (More information here):
sudo apt-get install python-setuptools
2. Install Genshi, a web-template based tool that Trac is based on: (More information here.)
sudo easy_install Genshi
3. Install the python connector that will allows Trac to communicate with a MySQL Database.
sudo apt-get install python-mysqldb
4. Install Babel, the internationalization engine that Trac is based on:
sudo easy_install Babel==0.9.5
5. And finally... Install Trac!!
sudo easy_install Trac
6. If you want to use Trac with a MySQL Database, you will need to create a Database called trac and provide the needed privileges for the user 'tracuser' from MySQL monitor (More information about how to install and use MySQL on this previous blog):
CREATE DATABASE trac DEFAULT CHARACTER SET utf8 COLLATE utf8_bin;
GRANT ALL ON trac.* TO tracuser@localhost IDENTIFIED BY 'administrador';
If you are installing Trac in the same server that MySQL is installed, your connection query should be something like this:
mysql://tracuser:administrador@localhost/trac
If you are installing it in a different server you will have to change 'localhost' by the IP of the server were MySQL is installed
7. Create a directory where the configuration files of your Trac site will be stored e.g. /var/trac/testsite
8. Execute initenv command indicating the directory created in the previous step (You will be asked for several paramenters, including the connection query retrieved on the step 6) :
sudo trac-admin /var/trac/testsite initenv
The main configuration field of your site is found here:
/var/trac/testsite/conf/trac.ini
You can run a built-in server to start playing with your just installed tool:
sudo tracd --port 8000 /var/trac/testsite
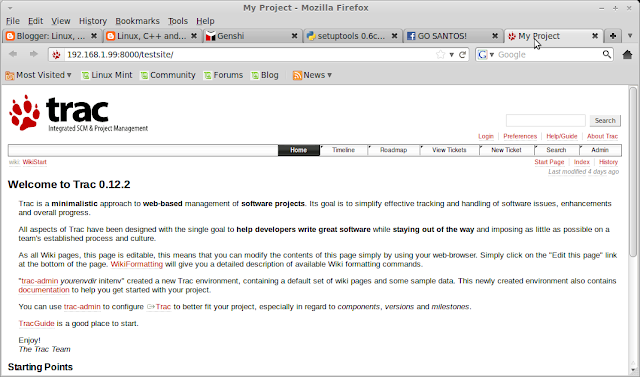
After doing that you should be able to browse your site:
Fig.1 Our first Trac Project
Finally I would like to mention a very interesting command that will provide the default user Administrator privileges over the whole site.
sudo trac-admin /var/trac/testsite permission add anonymous TRAC_ADMIN
B. Install Trac from the sources
1. Install Python
wget http://www.python.org/ftp/python/2.6.7/Python-2.6.7.tgz
export PATH=$PATH:~/bin/Python-2.6.7/Lib
tar -xvf Python-2.6.7.tgz
2. Install easy_install tool
wget http://pypi.python.org/packages/2.6/s/setuptools/setuptools-0.6c11-py2.6.egg#md5=bfa92100bd772d5a213eedd356d64086
export PYTHONPATH=$PYTHONPATH:/home/javier/bin/EasyInstall
sh setuptools-0.6c11-py2.6.egg --install-dir=~/bin/EasyInstall
export PATH=$PATH:~/bin/EasyInstall
3. Install Genshi
export PYTHONPATH=$PYTHONPATH:~/app/Genshi
easy_install --install-dir=~/app/Genshi/ Genshi
4. Install Babel
export PYTHONPATH=$PYTHONPATH:~/app/Babel
easy_install --install-dir=~/app/Babel/ Babel
5. Install Trac
export PYTHONPATH=$PYTHONPATH:~/app/Trac
easy_install --install-dir=~/app/Trac/ Trac
./trac-admin ~/tracsites/ initenv
./tracd --port 8000 ~/tracsites/ initenv

No comments:
Post a Comment