Thursday, December 13, 2012

Using C++ Libraries from Python

It's been a while since my last post but here I am back with a very interesting post about Wrapping C++ libraries to be used in python.

First of all we are going to create a classical client-library program. You can find all the details in my previous post: http://linuxtortures.blogspot.fr/2012/02/shared-libraries-with-eclipse.html


Our library will contain a very simple method "getSomething()" that will return the string "something"


Configure the client project:

Right-click --> Properties

Under  C/C++ build, under Settings, under Cross G++ Compiler, under Includes, include the path "${workspace_loc:/Library/src}"

Under  C/C++ build, under Settings, under Cross G++ Linker,  under Libraries, include the library "Library" and the library search path "${workspace_loc:/Library/Debug}"

Configure the library project (Only if running under 64bits):

Right-click --> Properties

Under  C/C++ build, under Settings, under Cross G++ Compiler, under Miscellaneous, select the option "Position Independent Code (-fPIC)"

Compile the code and check that everything is ok, these should be the commands used:


Building file: ../src/Client.cpp
Invoking: Cross G++ Compiler
g++ -I"/home/javier/workspaceSharedLibraries/Library/src" -O0 -g3 -Wall -c -fmessage-length=0 -MMD -MP -MF"src/Client.d" -MT"src/Client.d" -o "src/Client.o" "../src/Client.cpp"
Finished building: ../src/Client.cpp

Building target: Client
Invoking: Cross G++ Linker
g++ -L"/home/javier/workspaceSharedLibraries/Library/Debug" -o "Client"  ./src/Client.o   -lLibrary
Finished building target: Client


Include the path where is located the compiled Library:


That should be enough to allow running our client:


Now we are going to create our Library wrapper, that will basically allows us to use the Library from python:

First of all, install all the needed dependencies:

sudo apt-get install python-devq                       
sudo apt-get install libboost-python-dev           

Create a new shared library and call it "PythonWrapper":


Important points:

1. Name of the module must match with the name of our library:

BOOST_PYTHON_MODULE(libPythonWrapper)

If you do not follow this advice, you will have issues when importing the library from python:


>>> import libPythonWrapper                                                                                      
Traceback (most recent call last):                                                                              
  File "<stdin>", line 1, in <module>                                                                         
ImportError: dynamic module does not define init function (initlibPythonWrapper)


2. Name of the python Class:

class_<Class>("Class")

The name under quotes is how it will looks on python our class, name it the same than in C++ in order to avoid confussion.

3. Name of the python method name:

.def("getSomething", &Class::getSomething)

Same advice, do not invent, and name it the same than our C++ method.

Add the following paths:


And link against the following libraries:


Compile the library, the output should be something like that:


Building file: ../src/PythonWrapper.cpp
Invoking: GCC C++ Compiler
g++ -I"/home/javier/workspaceSharedLibraries/Library/src" -I/usr/include/python2.7 -O0 -g3 -Wall -c -fmessage-length=0 -fPIC -MMD -MP -MF"src/PythonWrapper.d" -MT"src/PythonWrapper.d" -o "src/PythonWrapper.o" "../src/PythonWrapper.cpp"
Finished building: ../src/PythonWrapper.cpp

Building target: libPythonWrapper.so
Invoking: GCC C++ Linker
g++ -L"/home/javier/workspaceSharedLibraries/Library/Debug" -shared -o "libPythonWrapper.so"  ./src/PythonWrapper.o   -lLibrary -lboost_python -lpython2.7
Finished building target: libPythonWrapper.so

Export the path of our original shared library and import the wrapper from python:


Monday, July 16, 2012

Communicating with RaspBerry via GSoap Web Services

According to wikipedia "A Web service is a method of communication between two electronic devices over the Web (Internet)." I would not say over the 'Web', indeed you can communicate within a local area network without the need on going 'Web'.

On this tutorial we are going to explain step by step how to deploy a Web Service on our Rasberry. We are also going to see how to develop a little application in our laptop that will communicate with this Web Service.

The protocol used on a web service is called 'SOAP' and is based on 'XML'. The following diagram explains in a simplified way how a Web Service communication is carried out.


Fig.1 Simplified SOAP exchange diagram 

The most common usage of Web Services is via HTTP, and that is the reason behind its popularity. In fact all the existing web infrastructure (from routers to web servers) fits perfectly on this model, without the need of adapt absolutely anything.

How the xml is formed, is specified on the SOAP protocol. Normally the commercial Web Services API, like the ones used on .Net, Java, or C++, hide the complexity of the protocol, so we can focus on our object s model and the 'dirty' work of converting those object on 'XML' (and viceversa) is completely transparent for us.

1. Downloading GSoap.

GSoap is a open source Web Service API, written in C and C++. You can download the last version from here.

There are 2 important tools shipped on the download, the one that we are going to use is called 'soapcpp2' and you can find it on the following path:

./gsoap-2.8/gsoap/bin/linux386/soapcpp2


2. Defining our service interface.

On this example we are going to create a service that returns the hour from our Raspberry.

The service interface is defined in a similar way than a library interface. We are going to create a header defining the method that will be called:

Fig. 2 Sevice Definition header


2. Generating the server classes.

Now that our service is defined, we have to generate the classes that will handle the request. Fortunately this can be done automatically by using 'soapcpp2'. Go to your project path (in my case ~/workspace/workspace64/GSoapTuto/MyRaspberryTimeServer/src) and execute soapcpp2 with  the following options:


~/Desktop/GSoap/gsoap-2.8/gsoap/bin/linux386/soapcpp2 -S  currentTime.h

-S indicates server-side only files


If everything went ok, several files should have been added to your project:

Fig 3. Auto generated code


Remove the files 'soapcurrentTimeService.cpp' and 'soapcurrentTimeService.h', and add the files 'stdsoap2.cpp' and 'stdsoap2.h'. You can find these last on the downloaded package (/gsoap-2.8/gsoap).


2. Creating a standalone server.


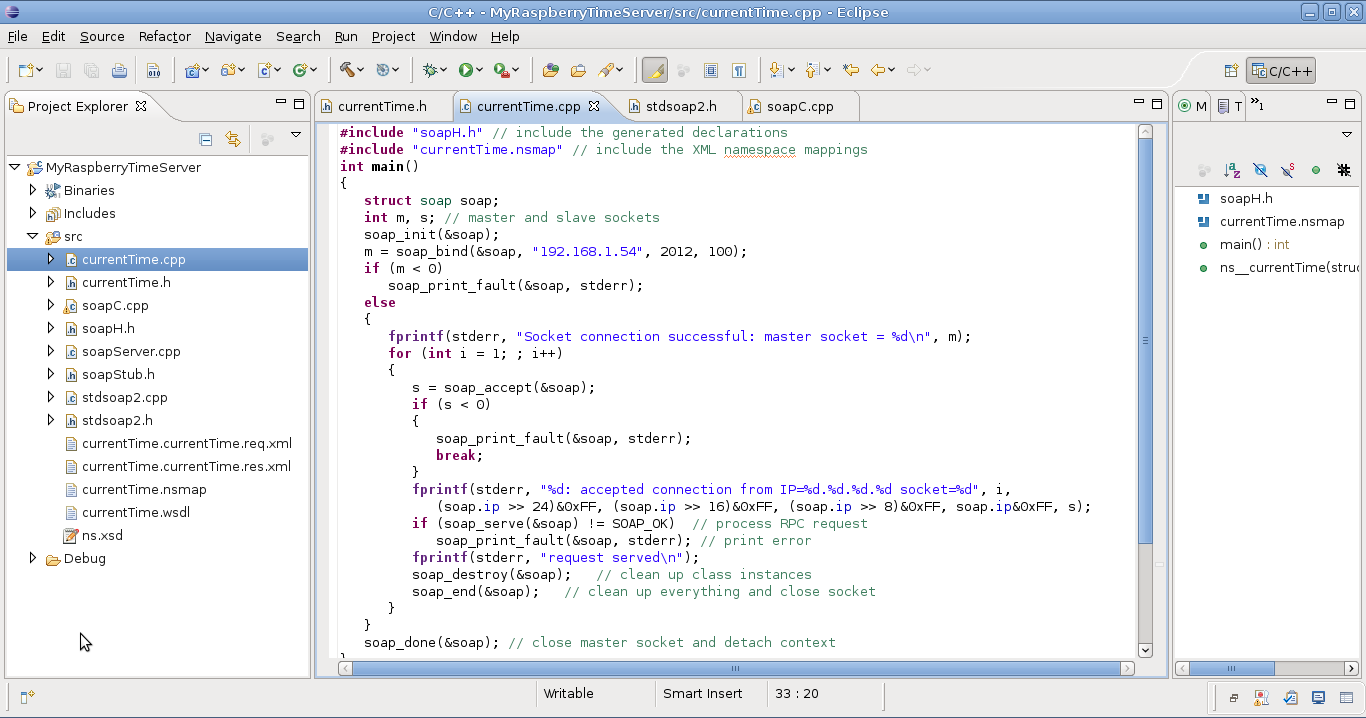
We are almost done with the server, we just need to create a new file 'currentTime.cpp' and create the 'main' method and define what must be done when 'ns__currentTime' is called.


Fig 4. Resultant file structure


currentTime.cpp code:


#include "soapH.h" // include the generated declarations 
#include "currentTime.nsmap" // include the XML namespace mappings 
int main() 
{
   struct soap soap;
   int m, s; // master and slave sockets
   soap_init(&soap);
   m = soap_bind(&soap, "192.168.1.54", 2012, 100);
   if (m < 0)
      soap_print_fault(&soap, stderr);
   else
   {
      fprintf(stderr, "Socket connection successful: master socket = %d\n", m);
      for (int i = 1; ; i++)
      {
         s = soap_accept(&soap);
         if (s < 0)
         {
            soap_print_fault(&soap, stderr);
            break;
         }
         fprintf(stderr, "%d: accepted connection from IP=%d.%d.%d.%d socket=%d", i,
            (soap.ip >> 24)&0xFF, (soap.ip >> 16)&0xFF, (soap.ip >> 8)&0xFF, soap.ip&0xFF, s);
         if (soap_serve(&soap) != SOAP_OK) // process RPC request
            soap_print_fault(&soap, stderr); // print error
         fprintf(stderr, "request served\n");
         soap_destroy(&soap); // clean up class instances
         soap_end(&soap); // clean up everything and close socket
      }
   }
   soap_done(&soap); // close master socket and detach context
}
int ns__currentTime(struct soap *soap, time_t& response) 

   response = time(0); 
   return SOAP_OK; 
}


You will have to change the line 'm = soap_bind(&soap, "192.168.1.54", 2012, 100);' and set the IP of your Raspberry (192.168.1.54 in my case) and the port you want it to listen from (2012 in my case).


If you want to make the resultant program work on Raspberry, you will have to cross-compile it. You can do it by changing the properties of your project and performing the following changes:


Under GCC C++ Compiler, change Command: 'g++' by 'arm-linux-gnueabi-g++'
Under GCC C++ Linker, change Command: 'g++' by 'arm-linux-gnueabi-g++'


You can find more information about cross-compilation for Raspberry on my previous post here.


2. Executing the server on Raspberry


The last thing we have to do is to copy the resultant compiled into Raspberry:

fig 5. Copy the resultant program to raspberry using scp


And finally, execute it:


Fig 6. Raspberry serving our service


3. Developing the client:


Now that we have a Web Service deployed on our RaspBerry, lets communicate with it. The steps to build the client are quite similar to the ones we followed to build the server.

First, we create a client project, containing exactly the same header definition than the one we used for the server (you can copy-paste the file).

From the project src path (~/workspace/workspace64/GSoapTuto/MyRaspberryTimeClient/src in my case), execute the following command to generate the code for the client:


~/Desktop/GSoap/gsoap-2.8/gsoap/bin/linux386/soapcpp2 -i -C  currentTime.h

Add the 'stdsoap2.cpp' and 'stdsoap2.h' as we did for the server. And finally add 'currentTime.cpp' including the main method with the following content:

Fig 7. Resultant client structure


Finally, on change the line 'soap_endpoint = "http://www.yourdomain.com/currentTime.cgi";' on the file 'soapcurrentTimeProxy.cpp' in order to target your Raspberry:

soap_endpoint = "http://192.168.1.54:2012"; in my case


And that's all!! If you fulfilled all the steps, after compiling and executing your client, you should get a beautiful result like 'The time is 1342473837' indicating the date in seconds from your Raspberry.

If you have a look to the Raspberry console, it should display some info about the just served request:

Fig 8. First Raspberry served request!!


Friday, June 22, 2012

Cross Compiling and Cross Debugging C++ with Eclipse from Debian Squeeze x64 to Debian Squeeze ARM (Raspberry Pi)

1. Introduction

I have received yesterday my Raspberry Pi (http://www.raspberrypi.org/unit. 


Fig 1. Raspberry Pi connected


After complete successfully the basic setup (http://www.raspberrypi.org/quick-start-guide)  and after installing the Debian Squeeze distribution provided by the community (http://www.raspberrypi.org/downloads) I want to collaborate with this interesting project by writing a step by step tutorial that will show how to create a program on C++, and how to run it and debug it on our Raspberry.

2. Pre-Requirements


2.1 Eclipse

As usual Eclipse is not completely mandatory (You can directly write C++ files with almost any text editor), but It is a great help.


If you do not have JAVA yet, you have to install it. You can do it from the  package manager.

Download Eclipse IDE for C/C++ Developers from the official download page (http://www.eclipse.org/downloads/)


Unzip it and execute the 'Eclipse' file inside the 'Eclipse' folder


2.2 Arm Toolchain Cross Compilation

In order to generate programs that can run and be debugged on our RaspBerry, we need to install an appropriated compiler and an appropriated debugger.

2.2.1. Add the native compiler, make and ncurses library if they are not already in your development system.


sudo apt-get install gcc g++ make libncurses5-dev


2.2.2. Add the following line to /etc/apt/sources.list


deb http://www.emdebian.org/debian/ squeeze main

2.2.3. Install the following packages:

sudo apt-get install linux-libc-dev-armel-cross
sudo apt-get install libc6-armel-cross 
sudo apt-get install libc6-dev-armel-cross 
sudo apt-get install binutils-arm-linux-gnueabi
sudo apt-get install gcc-4.4-arm-linux-gnueabi
sudo apt-get install g++-4.4-arm-linux-gnueabi 
sudo apt-get install uboot-mkimage

2.2.4. Install the remote gdb:

sudo apt-get install gdb-arm-linux-gnueabi

warning: At this point you can find conflicts with the already installed gdb (http://bugs.debian.org/cgi-bin/bugreport.cgi?bug=603347). If it is the case you will need to upgrade from gdb 7.0.1 (the currently installed) to gdb 7.4.1 (You can find it on http://ftp.gnu.org/gnu/gdb/). You will need to download it, configure it and install it, but do not worry too much, there are just 3 steps that can be found on the README file inside the downloaded file.

3. Our first Raspberry project

3.1 Open Eclipse and click on File --> C++ Project

3.2 Select Cross-Compile Project and give it a name and click on finish.

Fig 2. Our first Raspberry project on C++


3.3 Create a "src" folder inside the just created project and include a source file called "main.cpp" inside it. Fill the main.cpp with the following content:

Fig 3. Content and structure of our first Raspberry project on C++

4. Cross Compiling and executing the 'Hello World' project


4.1 Now that we have our project written, we need to compile it. In order to do that, open the project properties select settings and on the 'Cross G++ Compiler' change the command 'g++' by arm-linux-gnueabi-g++:

Fig 4. Cross project compiler

4.1 Do the same on the Cross G++ Linker:

Fig 5. Cross project linker


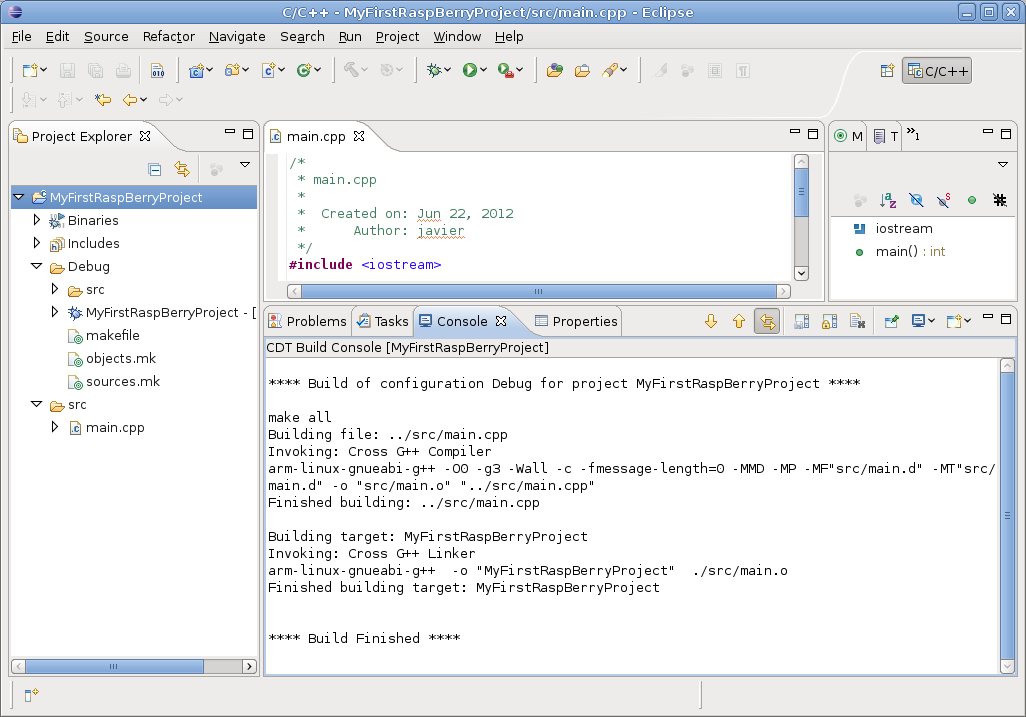
4.2 Build the project, (Ctrl+b) you should get a message on the console like the following one:

Fig 6. Cross project linker

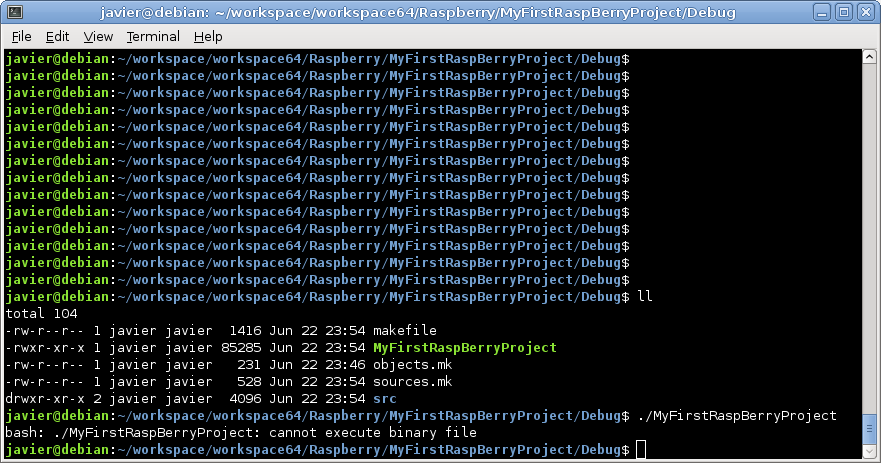
As you can see, the project has been compiled and linked by using arm-linux-gnueabi-g++, that was the whole point. If you try to run the compiled from eclipse you wont see nothing happening. If you try to run it from the command line, it wont be recognize as an executable:

Fig 7. Error when executing the result from the host


But if you copy it and execute it from the Raspberry:


Fig 8. Project executed from Raspberry

Voila!! Our first C++ Cross-project running on Raspberry  :D

4. Cross Debugging the 'Hello World' project


Now that we have run successfully our project, let's see how we can debug it.


4.1 Install on your Raspberry gdbserver


sudo apt-get install gdbserver 

4.2 Run gdb server against your program, listening on the port 2345:

gdbserver :2345 MyFirstRaspBerryProject

If everything went ok, the system should get stuck waiting for a remote debug:

Fig 9. gdbserver started on the raspberry machine

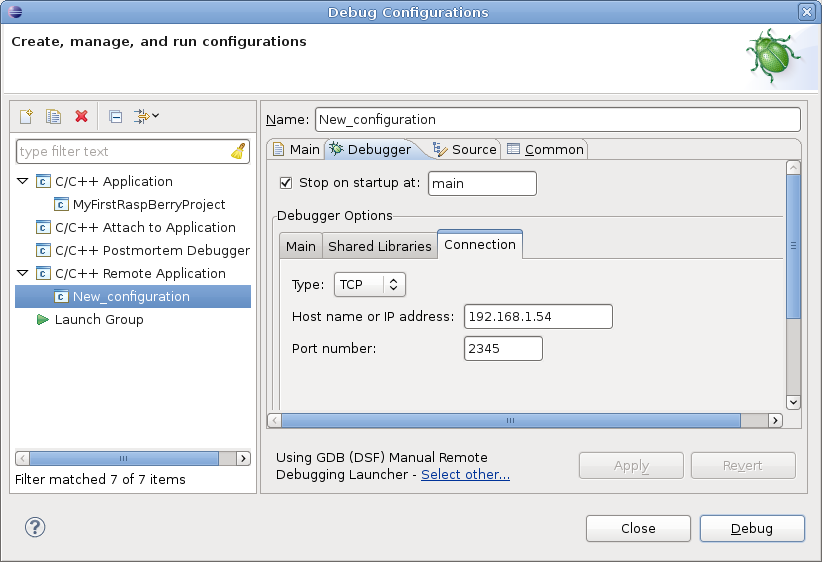
4.3 From Eclipse click on the arrow besides the symbol of debug and select 'Debug Configurations'. Click twice on the tab 'C/C++ Remote Application' an new remote application will be automatically created:

Fig 10. New debug configuration


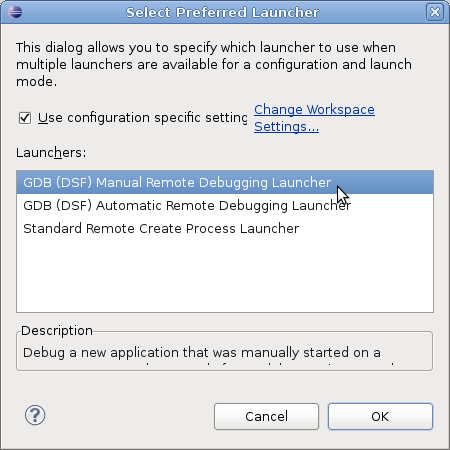
Click on the text 'Select other...' besides the button 'Apply'. On the new window, check the box 'Use configuration specific settings' and select  'GDB (DSF) Manual Remote Debuggin Launcher':

Fig 11. Manual Remote selection

Clicking on OK it will bring us to the previous screen. Set the main and debugger tabs as following:

Fig 12. Main Tab

Fig 13. Debugger Main Tab


Fig 14. Debugger Connection tab


Now you can click on the Debug button and:

Fig 15. Cross Debugging our project


Sunday, April 22, 2012

Unit Testing with CppUnit and Eclipse

As I already mentioned in one of my previous posts, CppUnit is a powerful framework that allows us to automatize the unit testing execution.Unit testing is an extremely important activity in our daily development life, not only from a theoretical quality-related point of view but also from a practical perspective like ensuring the behavior of our code before refactoring, preventing fixed bugs to appear once again etc.

The idea behind CppUnit is to develop parallel classes that will be the ones in charge of testing our 'real' classes. But let's have a look with an example.

1. Installing CppUnit

The first step of course is to get the tool and install it. You can download the last version from sourceforge (at this time 1.12.1) :

http://sourceforge.net/projects/cppunit/files/cppunit/

Untar the downloaded file, and from a terminal move inside the resultant directory and execute the following commands:


./configure
make
sudo make install


2. Using CppUnit for testing our Shared Libraries


A. Creating a shared library to be tested


Now that CppUnit is installed in our system it is time to use it. As example, I will test a shared library that under Eclipse. You can find how to create shared libraries on this previous post:

http://linuxtortures.blogspot.fr/2012/03/shared-libraries-with-eclipse-on-8664.html

Basically open eclipse and click on File --> new, and under the opened dialog select Shared Library, and Linux GCC


As we are under a 64 bits architecture, do not forget to compile with -fPIC, otherwise you will get the following error:

/usr/bin/ld: ./Calculator.o: relocation R_X86_64_32S against `vtable for Calculator' can not be used when making a shared object; recompile with -fPIC

You can activate -fPIC compilation under eclipse by right click on your project and under properties check the following option:


Our library will contain a class 'Calculator' that implements two methods: add and sub (please note that both method are inlined for the shake of simplicity):


A. Creating the testing project

Now let's create our test project, that it will be just an an executable linked to our shared library and of course to the CppUnit framework.

First create a new executable project:


Now link your project against libdl, libcppunit and of course the result of the shared library that we are planning to test. You will need to include the folder where the shared library is generated on the library search path:


The libdl is needed in order to avoid errors of the kind:

/usr/local/lib/libcppunit.so: undefined reference to `dlsym'
/usr/local/lib/libcppunit.so: undefined reference to `dlopen'
/usr/local/lib/libcppunit.so: undefined reference to `dlclose'

You will also need to include the path to our shared library headers in order to use it:


B. Creating the testing class:

Once finished ((almost)) all the including and configuring steps let's focus now on the 'pure' testing procedure.

The most basic case is to just create a class that inherit from CppUnit::TestCase and perform all the needed 'ASSERTS' on the overridden method 'runTest()', then on the main method of our testing project we just need to create a 'CppUnit::TextUi::TestRunner'  and include our just created class as a test to be run:

Here below you can find the code for our test class:


And here the one corresponding to the main method (the one actually in charge of of execute the tests):


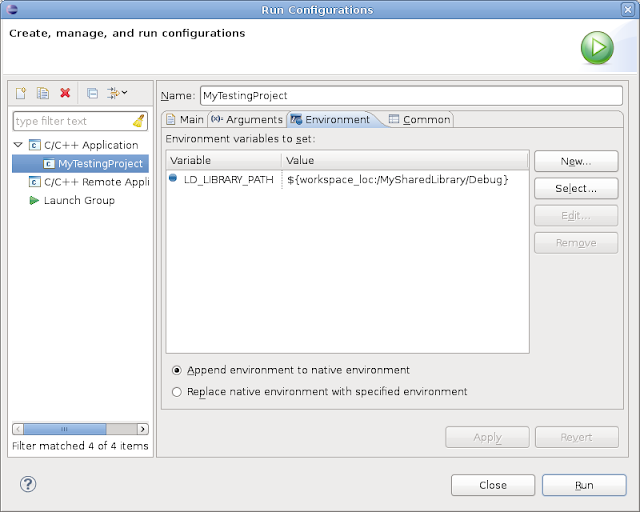
That's all, the last step you have to perform before running your test project is just to include your shared library on the environment of the run configuration:


Now you can run your testing project an have a look to the results on the console:


2. Making things more sophisticated by using TestFixture and TestSuite


What we have explained until now is quite nice and it should allows you to start writing your unit test within a cpp environment, but let's complicate the things a bit more and let's talk about testsuites and fixtures.

As you can see on the previous example, we are using the class TestCalculator and its overridden method runTest to create a test. This approach could be enough for most of the cases, but in some cases trying to test the functionality of a library by writing all the asserts in one method or by creating a lot of classes (one per test)  can lead to confusion.

Here is where the TestFixture and TestSuite suites arrive. A TestFixture, basically allows us to convert methods of a class into a testcase, and a TestSuite will allows us to group all those tests and execute them as if it were just one. But let's see all that with an example:

A. Modifying TestCalculator

Now our TestCalculator.h class is going to look like that:


#ifndef TESTCALCULATOR_H_
#define TESTCALCULATOR_H_


#include <Calculator.h>
#include <cppunit/TestFixture.h>
#include <cppunit/TestAssert.h>
#include <cppunit/TestCaller.h>
#include <cppunit/TestSuite.h>


class TestCalculator:  public CppUnit::TestFixture {
public:
TestCalculator();
virtual ~TestCalculator();


 static CppUnit::Test *suite()
 {
   CppUnit::TestSuite *suiteOfTests = new CppUnit::TestSuite( "CalculatorTestSuite" );


   suiteOfTests->addTest( new CppUnit::TestCaller<TestCalculator>(
                                  "Test Sum",
                                  &TestCalculator::testSum ) );
   suiteOfTests->addTest( new CppUnit::TestCaller<TestCalculator>(
                                  "Test Subtraction",
                                  &TestCalculator::testSub ) );
   return suiteOfTests;
 }


 void setUp()
 {
 }
 void tearDown()
 {
 }


private:
 Calculator calculatorToBeTested;


protected:
  void testSum()
  {
 CPPUNIT_ASSERT(calculatorToBeTested.add(1,2)==3);
  }
  void testSub()
  {
 CPPUNIT_ASSERT(calculatorToBeTested.sub(5,1)==4);
  }


};


#endif /* TESTCALCULATOR_H_ */


As you can appreciate there is a static method returning a class Test that indeed returns a TestSuite. This is can be easily understood by having a look to the following diagram:


Indeed it is a composite pattern (Design Pattern) so basically a TestSuite has the same type than TestCase and on the top of everything can indeed contains TestCases.

On the other hand, test caller also inherit from TestCase so with this statemen:


    suiteOfTests->addTest( new CppUnit::TestCaller<TestCalculator>(
                                   "Test Sum",
                                   &TestCalculator::testSum ) );


We area adding TestCases to our TestSuite on the form of a methods (testSum and testSub). It is also worth to mention that setUp method is called each time before executing the actual testMethod and tearDown right after executing it, allowing us to set some pre-conditions (in case of needed) release them.

The last modification we have to perform to have everything working is on our main method:


#include <iostream>
#include <cppunit/TestSuite.h>
#include <cppunit/ui/text/TestRunner.h>
#include "TestCalculator.h"
using namespace std;


int main() {


CppUnit::TextUi::TestRunner runner;
runner.addTest(TestCalculator::suite());
runner.run();


return 0;
}


We are now adding the suite returned from the static method to our runner. Here the results:


Note that now we are running two tests. In case we deliberately make one test fail:


  void testSum()
  {
 CPPUNIT_ASSERT(calculatorToBeTested.add(1,2)==4);
  }


Here the result, showing clearly the name of the test that failed, the line, and the assert.


Monday, April 9, 2012

Continuous Integration with Jenkins, Mercurial and CppUnit on C++

Hello again!! Today I am going to talk about Jenkins, an open source tool that enables the continuous integration and delivery for our projects. As usual we will explain on this post how to set up a basic configuration and have the tool working into a local environment, if you are looking for a more complex configuration you can download here for free the book 'Jenkins the definitive guide'.

Basically what we are following with the continuous integration is to set up an environment that periodically and automatically check out our code, builds it and pass a set of regression/unit tests.

Jenkins provides us with a set of features that allows that and much more, as automatic mails in case of broken builds, dashboards showing the tests results, CVS/Mercurial and others version control systems integration and on the top of everything a friendly web based interface allowing everybody to check the results and manage the system.

A. Installing Mercurial on Debian Squeeze

1. Download here the last release for debian

2. Add the key:

wget -q -O - http://pkg.jenkins-ci.org/debian/jenkins-ci.org.key | sudo apt-key add -


3. Install the following dependencies:

sudo apt-get install daemon


4. Install the package we downloaded on the step number 1:

sudo dpkg -i jenkins_1.454_all.deb


5. Logs & PID. By default Jenkins is executed as a stand-alone server, you can find the logs and the process id on the following files:

/var/log/jenkins/jenkins.log
/var/run/jenkins/jenkins.pid

6. Jenkins is configured by default to listen on the port 8080, if you fulfilled the previous steps, you should be able to see your jenkins interface by typing 'localhost:8080' on your favorite web explorer:


B. Linking Jenkins with our Project across Mercurial


The way Jenkins interacts with our source code is across mercurial, once Jenkins is properly configured it checks out our code, into a temp folder, builds the source code and executes the test that we have previously configured.

First of all you will have to install and configure mercurial on your machine. You can have a look here in order to know how to do it.

1. Putting our code under mercurial:

Since the objective of this post is not learn how to use mercurial, we will create a 'local' repository in our working directory (in my case /home/javier/workspace/workspace64/workspaceSharedLibrary) by executing the following command from the previous folder:

hg init


Now our source code is under mercurial and therefore can be accessed by Jenkins, let's see how.

2. Installing the Mercurial Plugin on Jenkins:

The mercurial plugin is not installed by default. From the initial Jenkins web page, click on 'Manage Jenkins', and afterwards click on 'Manage Plugins'. Under the available tab, you should be able to find 'Jenkins Mercurial plugin'. Check it and click on the button 'Install without restart'.

C. Configuring a new job

Now we have everything we need to configure our first 'job'. In Jenkins world, a 'job' is a set of task (that can be defined on a shell script) that are automatically executed within a configurable period, typically those tasks are related with building and testing.

From the initial page (localhost:8080) click on 'New job'. Give a name to your (in my case 'My_firs_job') select 'Build a free-style software project' and click 'ok', a new page allowing configure your job should be displayed. On the first part of the screen we are configuring the Mercurial repository (the local one) that jenkins must check out:


By scrolling down, we set up the frequency of the job. By setting 'Poll SCM' and putting ***** on the Schedule we are indicating that each minute, jenkins must check if there have been changes on the code and if it is the case it must executes the job. In this case the build is defined on the shell file 'home/javier/SANDBOX/Jenkins/build'. We will see the content of this file on the next section.


Finally, by scrolling down again, we can set the list of emails that must be notified in case that a build is not broken.


D. Create the build file ( /home/javier/SANDBOX/Jenkins/build)

The most basic build file is the one that executes the makefile that eclipse generates automatically. The variable 'WORKSPACE' is set up automatically by jenkins and defines the temporally directory where the code is check out.

#!/bin/bash
echo "*********building************"
echo $WORKSPACE
cd $WORKSPACE/InitialTest/Debug
echo $PWD
make clean
make


E. Configure the mail


In order to allow mail sending we have to link our jenkins platform with a mail server. In this case I will use my gmail acount for this end.

From the initial jenkins page (localhost:8080) click on 'Manage Jenkins' and then on 'Configure System'. At the bottom of the page you can set E-mail Notification parameters:


D. Executing the job


Now everything is configured and you can manually execute your job:

From the initial Jenkins page, select your job and on the left side of the page click on 'Build now'. A new item will be created on the 'Build History':


By clicking on the Build History item, you can enter to the details of the build. The most interesting information can be found on the 'Console Output' :

Started by user anonymous
Building in workspace /var/lib/jenkins/jobs/My_first_job/workspace
[workspace] $ hg showconfig paths.default
[workspace] $ hg pull --rev default
[workspace] $ hg update --clean --rev default
6 files updated, 0 files merged, 0 files removed, 0 files unresolved
[workspace] $ hg log --rev . --template {node}
[workspace] $ hg log --rev 1633c8b2cc6ab2fd1b40a594eb3cb21b1b9277f6
[workspace] $ hg log --template "<changeset node='{node}' author='{author|xmlescape}' rev='{rev}' date='{date}'><msg>{desc|xmlescape}</msg><added>{file_adds|stringify|xmlescape}</added><deleted>{file_dels|stringify|xmlescape}</deleted><files>{files|stringify|xmlescape}</files><parents>{parents}</parents></changeset>\n" --rev default:0 --follow --prune 1633c8b2cc6ab2fd1b40a594eb3cb21b1b9277f6
[workspace] $ /bin/sh -xe /tmp/hudson7862122761400994217.sh
+ /home/javier/SANDBOX/Jenkins/build
*********building************
/var/lib/jenkins/jobs/My_first_job/workspace
/var/lib/jenkins/jobs/My_first_job/workspace/InitialTest/Debug
rm -rf  ./src/InitialTest.o  ./src/InitialTest.d  InitialTest


Building file: ../src/InitialTest.cpp
Invoking: GCC C++ Compiler
g++ -I"/home/javier/workspace/workspace64/workspaceSharedLibrary/MySharedLibrary" -O0 -g3 -Wall -c -fmessage-length=0 -MMD -MP -MF"src/InitialTest.d" -MT"src/InitialTest.d" -o "src/InitialTest.o" "../src/InitialTest.cpp"
../src/InitialTest.cpp: In function ‘int main()’:
../src/InitialTest.cpp:19: warning: unused variable ‘value’
Finished building: ../src/InitialTest.cpp


Building target: InitialTest
Invoking: GCC C++ Linker
g++  -o "InitialTest"  ./src/InitialTest.o   -lopencv_core -lopencv_highgui -lopencv_imgproc -lopencv_features2d -lopencv_calib3d
Finished building target: InitialTest
Finished: SUCCESS


E. Setting Green Balls as success indicator:

By default Jenkins indicates a successful build with a blue ball. If you (like me) consider that green color is more appropriated for this end, you just need to install the 'Green Balls' pluging;

From the initial Jenkins page click on 'Manage Jenkins' then on 'Manage Plugins' and under 'Available' tab find the 'Green Balls' plugin. Select it and click on 'Install without restart'. In order to have the plugin working, you will need to clean the cache of your explorer.

F. Unit Tests


As final step we are going to set up a unit test project that will be automatically executed (as the build) each time that someone commit a change in the central repository.

The first thing we need is to install 'CppUnit'. CppUnit is an open-source project that provides us with a set of utilities allowing include statements like 'assert' in our code. You can find more information about CppUnit in the official project page:

http://sourceforge.net/projects/cppunit/

More information and examples can be found on the CppUnit cookbook:

http://cppunit.sourceforge.net/doc/1.8.0/cppunit_cookbook.html

1. Download and Install.

From the project page, download and untar the last version of the project (1.12.1).

From the untar directory, execute the following commands:


./configure
make
sudo make install


2. Create your test project.

Using eclipse, create a new C++ project and add the following libraries:

libcppunit.so
libdl.so

If you do not include the libdl.so library, you will receive the following errors at building time:


/usr/local/lib/libcppunit.so: undefined reference to `dlsym'
/usr/local/lib/libcppunit.so: undefined reference to `dlopen'
/usr/local/lib/libcppunit.so: undefined reference to `dlclose'


Your project settings should look like this:


3. Make a shell executing the test project and transforming the results

I will dedicate a whole post to CppUnit, but by the time being we will consider enough to have a project working and generating a resulting report test (you can find how to do this on the CppUnit cookbook)

Once we have developed our test project we just need to create a new shell script (/home/javier/SANDBOX/Jenkins/tests) that runs it and transforms the result into a new report 'readable' by Jenkins:


 #!/bin/bash
echo "*********building tests project************"
echo $WORKSPACE
cd $WORKSPACE/CppUnitProject/Debug
echo $PWD
make clean
make 
$WORKSPACE/CppUnitProject/Debug/CppUnitProject
xsltproc /home/javier/SANDBOX/Jenkins/transform.xsl $WORKSPACE/CppUnitProject/Debug/cpptestresults.xml > $WORKSPACE/testresults.xml


In the previous script we are just executing the auto-generated (by Eclipse) make file and applying a xslt transformation that generates 'testresults.xml' from 'cpptestresults.xml'. In order to do that you will need the transformation file (in our case /home/javier/SANDBOX/Jenkins/transform.xsl) with the following content:


<?xml version="1.0" encoding="UTF-8"?>
<xsl:stylesheet version="1.0" xmlns:xsl="http://www.w3.org/1999/XSL/Transform">
    <xsl:output method="xml" indent="yes"/>
    <xsl:template match="/">
        <testsuite>
            <xsl:attribute name="errors"><xsl:value-of select="TestRun/Statistics/Errors"/></xsl:attribute>
            <xsl:attribute name="failures">
                <xsl:value-of select="TestRun/Statistics/Failures"/>
            </xsl:attribute>
            <xsl:attribute name="tests">
                <xsl:value-of select="TestRun/Statistics/Tests"/>
            </xsl:attribute>
            <xsl:attribute name="name">from cppunit</xsl:attribute>
            <xsl:apply-templates/>
        </testsuite>
    </xsl:template>
    <xsl:template match="/TestRun/SuccessfulTests/Test">
        <testcase>
            <xsl:attribute name="classname" ><xsl:value-of select="substring-before(Name, '::')"/></xsl:attribute>
            <xsl:attribute name="name"><xsl:value-of select="substring-after(Name, '::')"/></xsl:attribute>
        </testcase>
    </xsl:template>
    <xsl:template match="/TestRun/FailedTests/FailedTest">
        <testcase>
            <xsl:attribute name="classname" ><xsl:value-of select="substring-before(Name, '::')"/></xsl:attribute>
            <xsl:attribute name="name"><xsl:value-of select="substring-after(Name, '::')"/></xsl:attribute>
            <error>
                <xsl:attribute name="message">
                    <xsl:value-of select=" normalize-space(Message)"/>
                </xsl:attribute>
                <xsl:attribute name="type">
                    <xsl:value-of select="FailureType"/>
                </xsl:attribute>
                <xsl:value-of select="Message"/>
                File:<xsl:value-of select="Location/File"/>
                Line:<xsl:value-of select="Location/Line"/>
            </error>
        </testcase>
    </xsl:template>
    <xsl:template match="text()|@*"/>
</xsl:stylesheet>


4. Setting jenkins to execute the new shell

Once everything is in place we just need to include a new shell in our Job. From the initial Jenkins page click on your existing job and on menu placed on the left, click on configure. On the build section click on 'Add Build Step' and select 'Execute shell'. Set the location of our script (in my case /home/javier/SANDBOX/Jenkins/tests) and save the changes.


Now when building our job and checking the console output you should see that the test unit project is executed:


*********building tests project************
/var/lib/jenkins/jobs/My_first_job/workspace
/var/lib/jenkins/jobs/My_first_job/workspace/CppUnitProject/Debug
rm -rf  ./src/CppUnitProject.o ./src/MyClass.o ./src/MyClassTest.o  ./src/CppUnitProject.d ./src/MyClass.d ./src/MyClassTest.d  CppUnitProject

Building file: ../src/CppUnitProject.cpp
Invoking: GCC C++ Compiler
g++ -O0 -g3 -Wall -c -fmessage-length=0 -MMD -MP -MF"src/CppUnitProject.d" -MT"src/CppUnitProject.d" -o "src/CppUnitProject.o" "../src/CppUnitProject.cpp"
Finished building: ../src/CppUnitProject.cpp

Building file: ../src/MyClass.cpp
Invoking: GCC C++ Compiler
g++ -O0 -g3 -Wall -c -fmessage-length=0 -MMD -MP -MF"src/MyClass.d" -MT"src/MyClass.d" -o "src/MyClass.o" "../src/MyClass.cpp"
Finished building: ../src/MyClass.cpp

Building file: ../src/MyClassTest.cpp
Invoking: GCC C++ Compiler
g++ -O0 -g3 -Wall -c -fmessage-length=0 -MMD -MP -MF"src/MyClassTest.d" -MT"src/MyClassTest.d" -o "src/MyClassTest.o" "../src/MyClassTest.cpp"
Finished building: ../src/MyClassTest.cpp

Building target: CppUnitProject
Invoking: GCC C++ Linker
g++  -o "CppUnitProject"  ./src/CppUnitProject.o ./src/MyClass.o ./src/MyClassTest.o   -lcppunit -ldl
Finished building target: CppUnitProject


Resources

http://jenkins-ci.org/
http://schneide.wordpress.com/2008/09/29/using-hudson-for-ccmakecppunit/
http://cppunit.sourceforge.net/doc/1.8.0/cppunit_cookbook.html#cppunit_cookbook
http://www.wakaleo.com/books/jenkins-the-definitive-guide